Dashboard App (Beginner's Guide)
The PC / mobile app that takes the distance readings from your UWB anchors and draws each tag's position on a map. This guide walks through every step a first-time user needs.
| Data tab | Map view |
|---|---|
 |
 |
Source / download: https://github.com/wshan1977/controlbit_uwb_rtos
What you need before starting
| Item | Check |
|---|---|
| UWB anchor boards (3+ recommended) | Mounted on ceiling/walls, powered on |
| At least one UWB tag (the moving device) | A device that travels between the anchors |
| MQTT broker | Public broker.hivemq.com is fine to start with |
| Anchors actually publishing? | The anchor must be configured with the same broker / topic prefix — see Device Configuration |
The anchors and the dashboard must point at the same broker and the same topic prefix. If anchors publish to
uwb/range/A0, the dashboard must subscribe touwb/range/+to see all of them.
1. Pick how to run the app
A. Web browser (easiest)
No install needed; runs in Chrome. (A hosted URL will be published once it's live.)
B. Windows / Mac / Linux desktop
git clone https://github.com/wshan1977/controlbit_uwb_rtos.git
cd controlbit_uwb_rtos
flutter pub get
flutter run -d windows      # Windows
flutter run -d macos        # Mac
flutter run -d linux        # Linux
C. Android
If this is your first time with Flutter, follow the OS-specific install at https://docs.flutter.dev/get-started/install first.
2. First launch — connect to the broker
The app shows a connection form on first launch.
📷 [image placeholder] Empty MQTT connection form on first launch. Filename:
assets/dashboard_connection_form.png
| Field | Public test (HiveMQ) | Private Mosquitto |
|---|---|---|
| Host | broker.hivemq.com |
192.168.0.10 (example) |
| TCP port | 1883 |
1883 |
| WebSocket port | 8884 |
9001 |
| WS path | /mqtt |
/ |
| TLS | ON | OFF |
| Topic | uwb/range/+ |
uwb/range/+ |
Which port do I use?
- Web browser: WebSocket port (e.g.
8884+ TLS ON). Browsers can't open raw TCP sockets. - Desktop / Android: TCP port (e.g.
1883).
Why does Topic have a + in it?
+ is the MQTT single-level wildcard ("any one segment"). Subscribing to uwb/range/+ catches uwb/range/A0, uwb/range/A1, uwb/range/A2, ... — every anchor at once.
Connection failing?
- Public brokers usually need TLS (HiveMQ uses 8884 + WSS).
- Corporate / home firewalls may block the chosen port.
- Make sure the anchor's topic prefix matches what the dashboard subscribes to.
3. Register anchor positions — the critical step
The dashboard needs to know where in space each anchor sits to compute tag positions. Register at least 3 anchors before any position estimate runs.
Procedure
📷 [image placeholder] Top of the dashboard with the 📍 icon highlighted. Filename:
assets/dashboard_anchor_button.png
- Tap the 📍 (map pin) icon at the top right.
- Press the add-anchor button.
- Enter four values:
| Field | Meaning | Example |
|---|---|---|
src |
Anchor identifier. Must match the firmware's src exactly. |
A0 |
idx |
Index into the range[] array (0..7). Auto-derived from trailing digits in src. |
0 |
X |
Anchor X coordinate | 0 |
Y |
Anchor Y coordinate | 0 |
cal |
Distance offset (typically a small ±10 nudge after measuring) | 0 |
Picking coordinates — first time
Pick one corner of the room as the origin (0, 0) and measure each anchor in metres. Centimetres or millimetres also work — only the units between coordinates and the firmware's distance values must match.
A starter 3-anchor layout:
| src | idx | X | Y |
|---|---|---|---|
A0 |
0 | 0 | 0 |
A1 |
1 | 5 | 0 |
A2 |
2 | 0 | 5 |
📷 [image placeholder] Anchor-add form filled with the A0 row above. Filename:
assets/dashboard_anchor_form.pngUnit consistency is everything. If the anchor reports distances in cm, X/Y must also be cm. Mixing cm and m will throw the result off by a factor of 100.
4. Watch tags appear
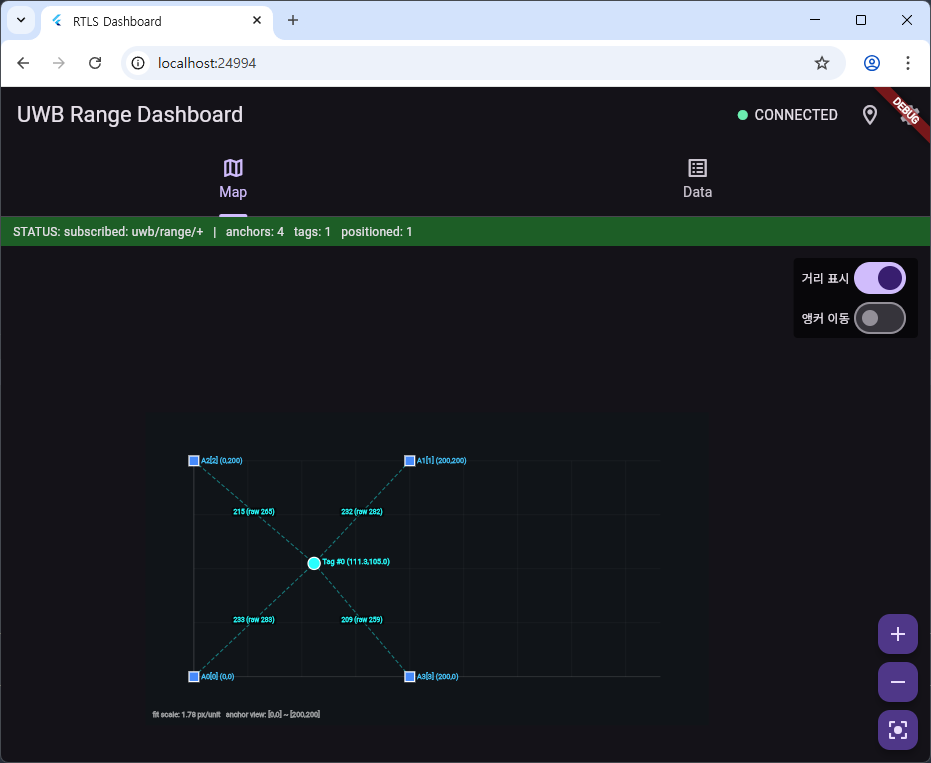
Map tab
- Blue squares — registered anchors
- Cyan circles — measured tags
- Dashed lines — anchor → tag distances (toggle on/off)
Controls: - Drag (mouse / finger) → pan - Wheel / pinch → zoom - Top-right ✏️ toggle → drag anchors to move them; new positions auto-save
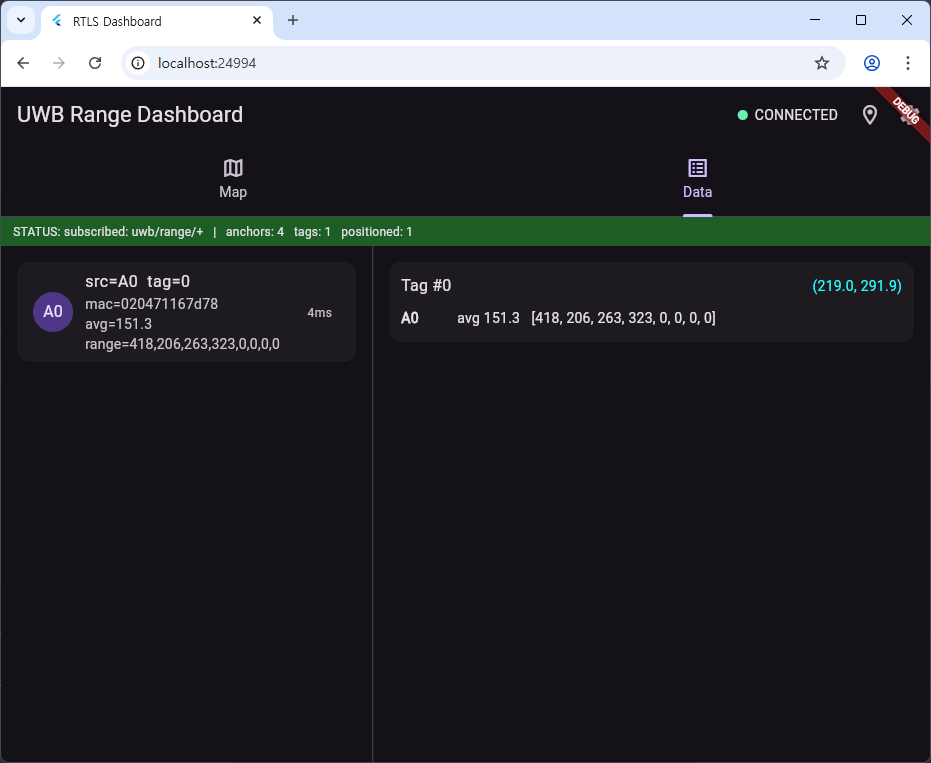
Data tab
- Latest reading per anchor
- A table of tag distances per anchor
- Estimated
(x, y)for each tag
The status bar at the top has counters: anchors / tags / positioned.
If positioned stays at 0, no tag is being positioned — see the next section.
5. Nothing showing up? — quick checklist
| Symptom | Check |
|---|---|
tags = 0 |
Subscribe topic wrong, or anchor isn't publishing. Inspect the anchor serial log. |
tags ≥ 1 but positioned = 0 |
Fewer than 3 anchors registered, mismatched src/idx, or unit mismatch. |
| Position jumps wildly | One anchor is producing outliers (multipath etc). The auto outlier reject helps but isn't infallible. |
| Constant offset | Tune each anchor's cal (signed offset added to its measured distance). |
The dashboard automatically drops an anchor as an outlier when its residual is more than 3× the median residual, then re-solves with the rest. So one or two flaky anchors don't sink the whole estimate.
6. FAQ
Q. How many anchors do I need? A. 3 minimum. 4+ makes the auto outlier reject more useful. 6–8 is very stable.
Q. How many tags concurrently?
A. Firmware build sets UWB_TAG_COUNT (default 64). The dashboard has no per-tag limit.
Q. Does it support 3D positioning? A. Currently 2D (X/Y) only. Z values, if entered, are ignored.
Q. Are coordinates in metres or centimetres? A. Either. Just match the units between coordinates and the firmware's distance reports. The trilateration is unit-agnostic.
Q. Are settings remembered?
A. Yes — anchor coordinates / cal / broker settings are saved in SharedPreferences and restored on next launch.
7. Where to next
- Anchor MQTT / Wi-Fi / OTA setup → Detailed Setup
- DIP-switch role/index → DIP Switch Reference
- Dashboard source / issues: https://github.com/wshan1977/controlbit_uwb_rtos